Monday, December 19, 2011

Greeting Farm Blog Hop

Hi Everyone!! Thank you so much for stopping by today! I can't wait to see all the Greeting Farm inspiration by everyone!! I am posting a card using Cheeky Cherry from the Greeting Farm in a Christmas style! Cheeky Cherry is one of my favorite Greeting Farm stamps and couldn't wait to color her! Here is my card:


Thank you for vising me today! Feel free to see more of my other Greeting Farm projects on my Facebook page here
Your next stop is:

Merry Christmas,

Kim

Friday, December 16, 2011

Christmas Cards

I found a fun pack of Christmas paper at my new found love HOBBY LOBBY and couldn't wait to use some of the paper from it for my cards! The colors in this paper pack are red, green, black, and white!

Here they are:

I love how this one turned out!!

Used my Trendy Twine!!  

Sunday, December 4, 2011

Thank you

Here is a thank you card I made for my recent birthday! It took me a little bit to figure out what I wanted on it but love the butterfly on it!


I used purple cardstock for the card base and border punched strip! I used The Luxury Stack By DCWV for the pinkish purple patterned paper and butterfly! Then added some white stitching! Sentiment is from Pink By Design. 

Thanks for stopping by,

Kim


Monday, November 28, 2011

Christmas Treats for the classroom

I came home today and received some crafty mail for the classroom from my sweet Mom! My mom and sister decided to make sour cream containers for my Kinder class! She used the Christmas Cardstock Stack from My Minds Eye!! This paper is so gorgeous!!! Here they are!


Thanks for stopping by! 

Kim 

Monday, November 14, 2011

Peachy Keen Sketch Challenge!

Hi there!! It has been so long since the last post but I wanted to share my entry with the latest Peachy Keen Sketch challenge!! If you know me, you know I love dogs!! I love how it turned out!

 I love comments! Please leave me some! 

Kim

Saturday, October 22, 2011

Halloween Treat Container

Hi There! This week the Sweet Sassy Diva Design Team is creating different treat containers! One of my favorite treat containers are the sour cream containers. I make them for every holiday, party, or just because occasion! They are very fast and simple to make! To watch the tutorial click here!

Here is my Halloween Sour Cream Container!

Recipe:

4inch by 6 inch Halloween Pattern DCWV paper
Black tag cut at 3inches from Art Philosophy
Orange tag cut at 2.75 inches from Art Philosophy
Black spider from Doodlecharms
Black tulle

I hope you enjoyed my post today! Be sure to check back each day for more creative treat box ideas! 

Kim :)

Thursday, October 13, 2011

Autumn Wreath

Hi There!!!  This week the Sweet Sassy Diva Design Team is creating Fall wreaths! I loved this idea! At first I was going to create another rosette wreath but then saw a wreath similar to this and had the idea ready to go! I LOVE my Close To My Heart Art Philosophy cartridge and couldn't wait to make some flowers!

Here is my wreath!
I chose some multi colored orange, creme, and gold colored yarn from my stash and a straw wreath from Michaels!

I cut out
I cut flowers from Art Philosophy and chalked the edges.
I adhered them to the wreath with a pearl stick pin.
Close up of flowers
flowers
My Fall Wreath!!


I hope you enjoyed my wreath!! If you want to see more wreaths or creations check out my facebook page too!

Tuesday, October 4, 2011

Autumn Banner

Hi There! This week the Sweet Sassy Diva Design team is creating projects using the AMAZING Close To My Heart Cricut Art Philosophy cartridge!!! I absolutely LOVE this cartridge and it really is a must have!! I decided to make a banner to celebrate my favorite season Autumn!

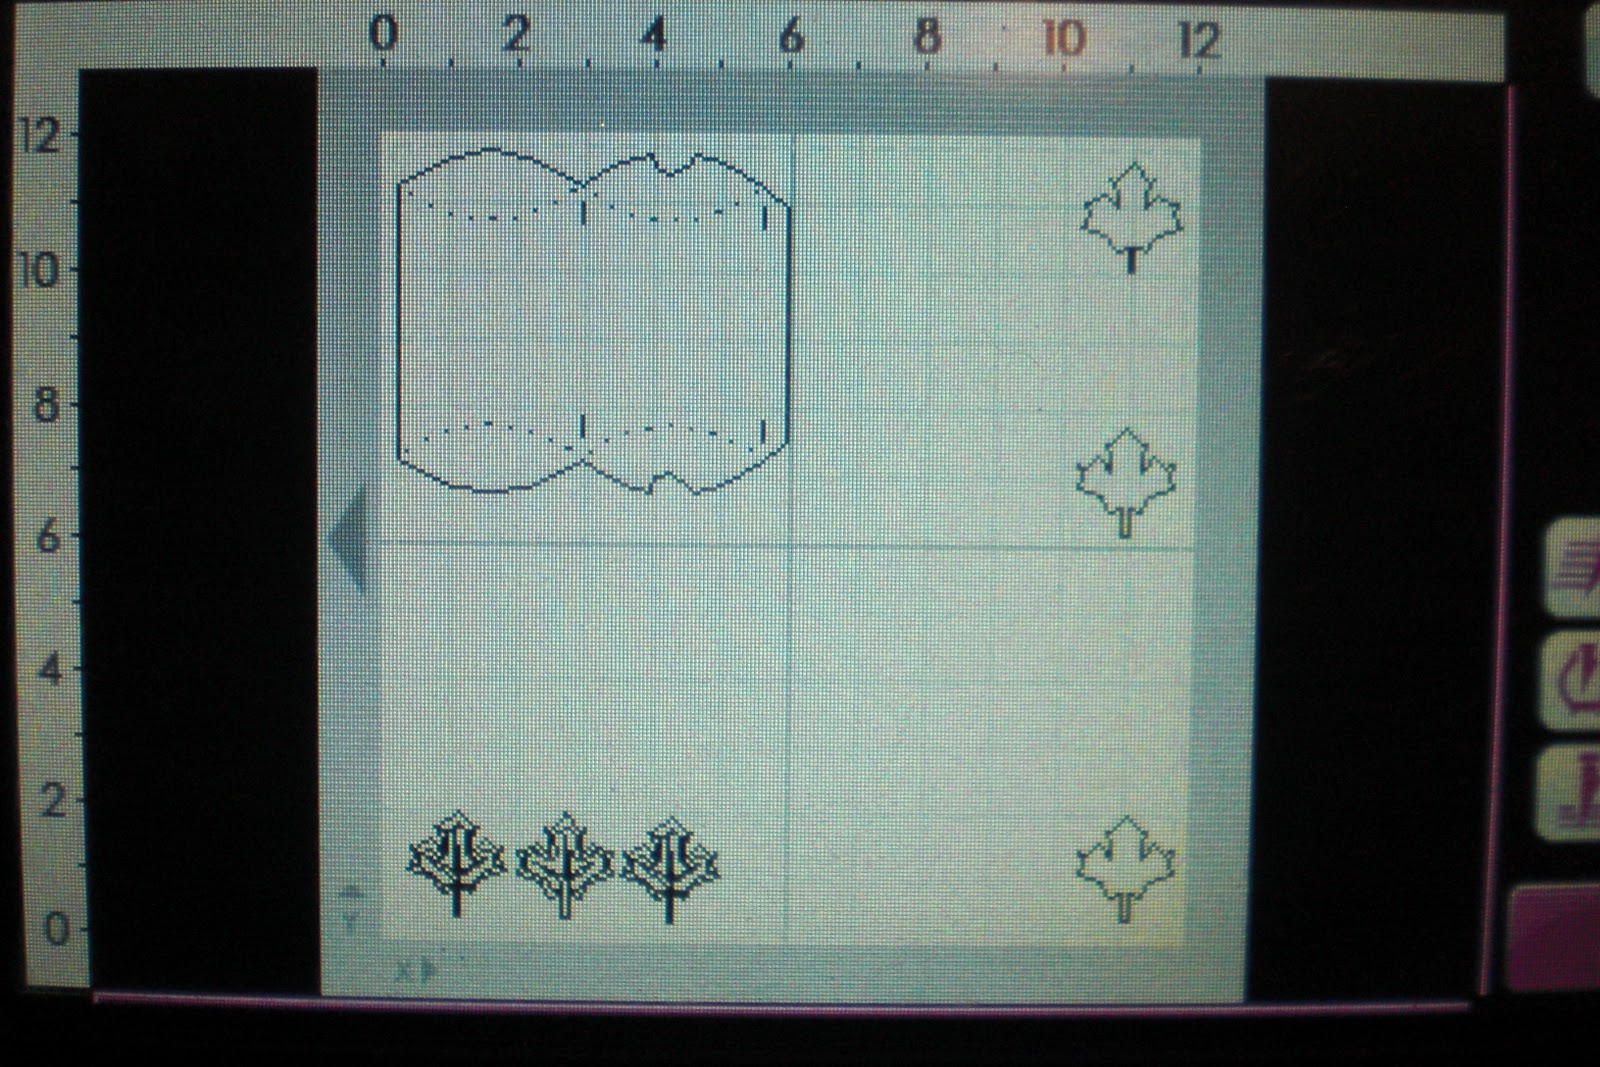
I programmed the images on my gypsy and added the layers.

Background images!
Cricut cuts made from the Art Philosophy cartridge. Paper stack is the DCWV Harvest stack!
Leaves

close up of letters

I love how the tree is framed so I didn't add another cut image into the square :)
My Autumn Banner!


I hope you like my banner! Its hard to see the letters in the picture but they look great in person! :) 

If you want to see more of my creations check out my facebook page!

Crafty hugs,

Kim

Thursday, September 22, 2011

Autumn Treats

Hi!  This week for Sweet Sassy Diva we are designing Autumn projects! I just got my new Art Philosophy cartridge and just had to use it! Every cut on my project is from the Art Philosophy cartridge. I LOVE Autumn! Its by far my favorite season! I love seeing all the colors change and the cool crisp mornings! I decided to make a pillow box!

Here it is:
I used my GYPSY to see my sizes of the pillow box and leaves!
Placed my papers and cut them accordingly!
I assembled the pillow box and added some Twine from the Twinery and my leaves!
I added an acorn and some pearl pen! 

I hope you enjoyed the pillow box! They are great to fill with a treat for family and friends! 
Make sure and come back each day for more Autumn inspiration from the Sweet Sassy Design Team! 
Hugs,

Kim

Tuesday, September 13, 2011

Remembering 9/11

Hello! This week for SweetSassyDiva we are honoring the HEROES of 9/11. That day has changed our country and will always be remembered. I remember exactly where I was the day I saw the Twin Towers on TV. It was a sad day for so many. I have many family members that have served or are currently serving in various branches of the military and I choose to support them all. I am very patriotic and thought that I would love to make a patriotic wreath! I was inspired by Pink Cricut's Halloween wreath. Click here if you would like to see it (She has an awesome video tutorial on it!)

Here is my wreath:

I cut my paper into various strips and scored them on my score board every .5 inches.  I used these to make the rosettes. Be careful of HOT glue!! It can make for very sore fingers.
I hot glued my rosettes to my cardboard circle. I have them layered for more dimension!
I added stars from the George and Basic Shapes Cartridge cut in various sizes.
I added red and blue buttons on the stars. Some of the buttons have the airmail twine in them.

I love how my wreath turned out and can't wait to make another one! Make sure you come back and check out more of the SweetSassyDiva Designers this week for more inspiration! 

Kim

Thursday, September 8, 2011

Grandparents Day

Hello again!  This week the SweetSassyDiva Design team has created projects in honor of Grandparents day! I decided to make a card that resembled a quilt for my Grandma Rose! She makes the most amazing quilts I have ever seen. I want to have everyone that she makes but understand I have to share with the rest of my family!........sigh........ well on to my card!

I cut nine 1.5 inch squares from the Mango Frost DCWV stack and 4.75 inch square of matching orange pattern paper.

I adhered the squares to the yellow pattern paper in a simple quilt pattern.

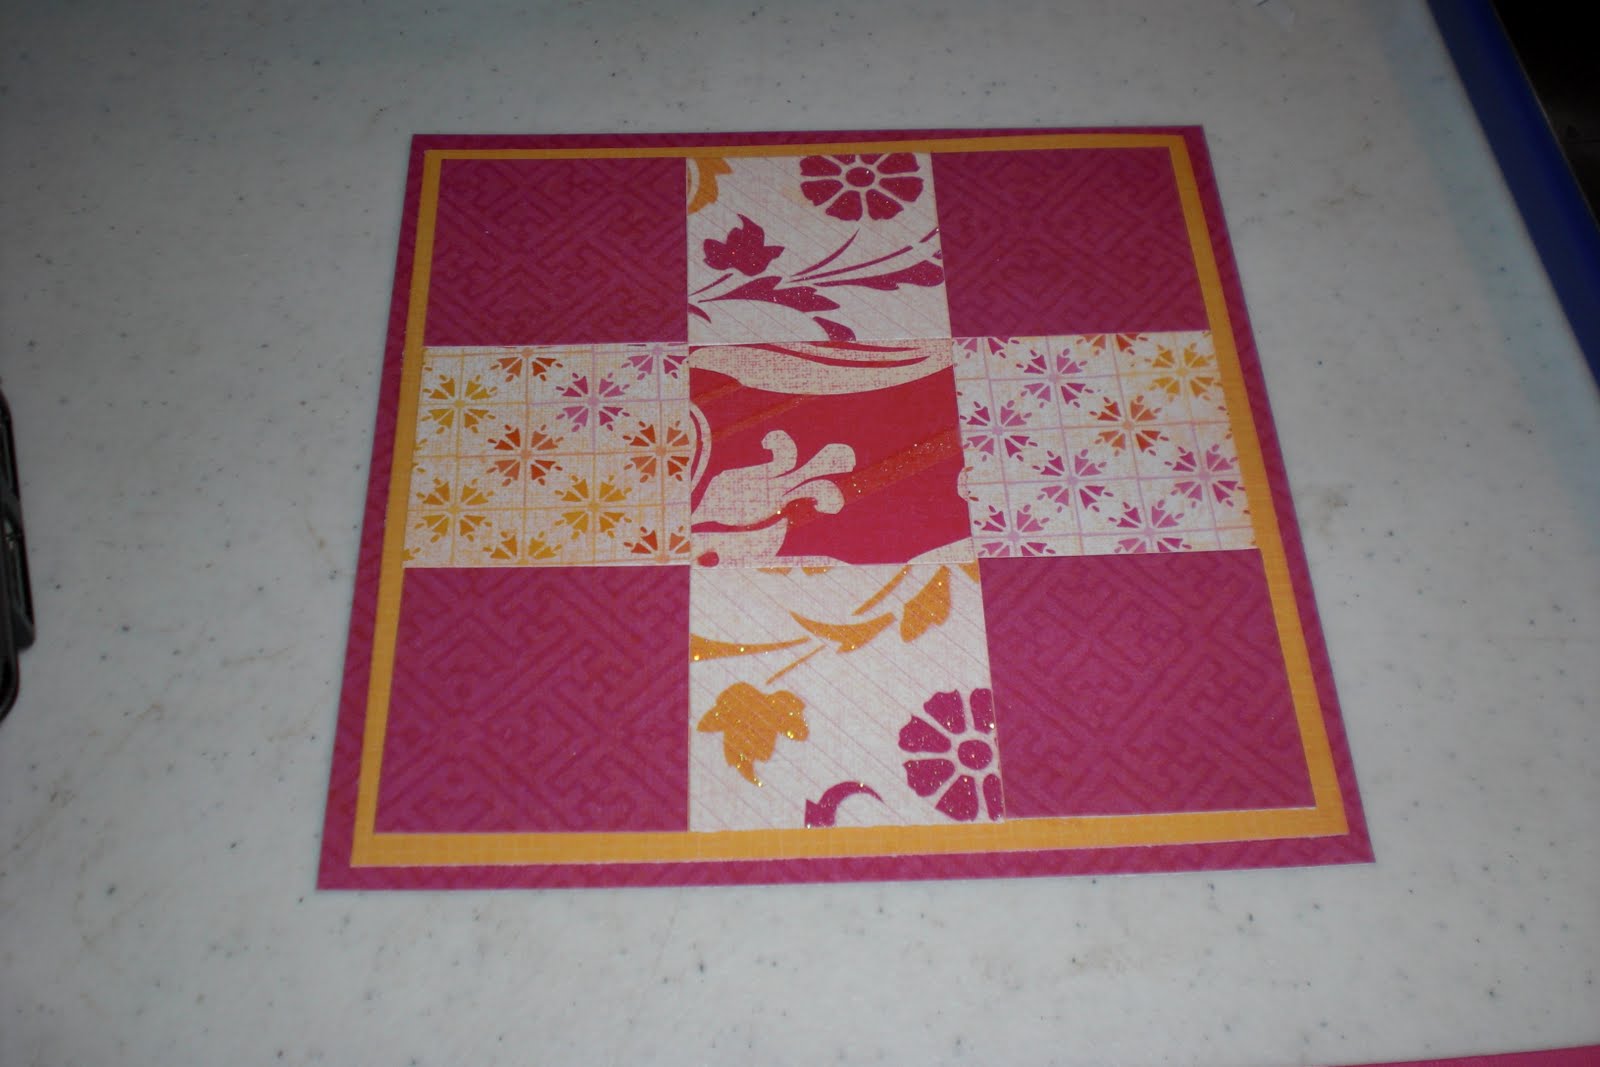
I then added the card front to a pink square cut at 5 inches.

Here is the card base for the easel card. It measures 5inches by 10 inches. I score it at 5 inches and 7.5 inches.
I added the yellow pattern paper to the card base and added a sentiment from Pink By Design. The Butterflies are from Kate's ABC's. Also added some white faux stitching!
Here is a side view of the card!


I hope you like my card! Don't forget to check back this week and see what the rest of the Design team has created for more inspiration!


Crafty Hugs,
Kim

Thursday, September 1, 2011

Boo Halloween Banner

Hi there! This week for Sweet Sassy Diva we are sharing some awesome Halloween Banners! I love Halloween! I love all the yummy candy that I get to buy for all the trick or treaters ;) (We have had a total of one in the past two years lol) I don't have a picture tutorial for you but I can give you the recipe for the banner!

Here is my banner!
Spooky ghost from Simply Charmed cut at 2.5 inches. I added a Peachy Keen Monster face with purple chalk around the eyes and pink cheeks. Banner is held together with orange and black trendy twine!

Here is the complete banner! Paper is from the DCWV Halloween Stack :)


I added white faux stitching around the edges! Font is Ashlyns Alphabet! My current favorite font! 

Recipe:

Black Triangles cut at 4 inches using Birthday Bash
DCWV Pattern paper triangles cut at 3.75 inches using Birthday Bash
BOO cut using Ashlyns Alphabet at 3 inches
Ghost cut from Simply Charmed
Banner held together using Trendy Twine Orange and Black!

I hope you like it! Be sure and check back each day to see the next Halloween Banner at Sweet Sassy Diva!

Crafty Hugs!

Kim

Saturday, August 27, 2011

Summer Halloween Blog Hop


Welcome to the Summer Halloween Blog Hop hosted by Scrapbookaholic Abby! If you want to start at the beginning click here! If you came from the amazing Katie you are in the right spot!

I love Halloween! I love decorating and seeing all of the adorable trick or treaters! I haven't been able to create much Halloween stuff yet but I was able to create a cute Halloween Card! 

I used my new DCWV Halloween Stack, Cricut for the spiders, and a new Martha Stewart punch for the spider webs!

Inside of the card!
Make sure you leave a comment on each blog for your chance at the awesome Blog Candy!!!
Little Scraps Of Heaven Designs Gift Certificate for $20 BUCKS! 

*** Abby's Crinkle Ribbon (like the one on her picture!) 6 yards/3colors


*** Mr. Cricut Crazy stamp set

*** Sakura Gelly Roll Pens (6 pack)

Thanks for stopping by! 

Happy Crafting!
 Kim


Your next stop is my friend  Michelle!

Here is the full line up in case you lose your place! 


Sunday, August 14, 2011

National Apple Week/ I love my Teacher Blog Hop Day 2

Hi Everyone! Welcome to Day 2 of the I love my Teacher Blog Hop! 

     If you just came to my blog and want to start at the beginning click here to see Abby's Amazing Project! If you just came from Karla you are in the right spot!

Originally this project was for my entry for the Sweet Sassy Diva Design team. We are making projects in honor of  National Apple Week! I love apples! Apples are a popular kitchen or classroom theme and are just plain cute! I am always making lists and decided to decorate a notepad for the fridge with apples. I chose red because they are my favorite! Here is my project:

I placed my apple layers by colors in the corners of my Gyspy. Apple is from Doodlecharms cartridge. 
I placed scrap paper in the corners for each layer.
I cut the top for the notepad at 4.5 inches by 5 inches and ran it through my paper crimper.
I glued the pattern paper on the top of the notepad.
I placed three strips of magnet on the back of the notepad to ensure it stays put!
Last, I placed the notepad on my fridge ready for lists!
I hope you liked my Apple Notepad! They are quick and fun gift to make for friends or family. 
Make sure you come and say hi on my facebook page and check back each day to see what the other awesome SweetSassyDiva Design team members create!

Your next stop is Libby

Hugs,

Kim

Friday, August 12, 2011

I love my Teacher Blog Hop

Hi there!!! Welcome to the I Love My Teacher Blog Hop! If you just came to my blog and want to start at the beginning click here to see Abby's Amazing Project! If you just came from Karla you are in the right spot! I am a teacher and decided to make something I know I would love! I love to attend every professional development workshop or training I can. A couple of years ago I went to the National Kindergarten Conference and a lady mentioned she had an Ideas I love Notebook and it has been in the back of my mind ever since. I finally made one that I LOVE with my DCWV School Stack!

Here it is:
Ideas I love Spiral Bound Altered Notebook! I made the tabs using my Stampin Up! circle punch. Each section can be used for websites, books, classroom mgmt, lesson ideas, and anything else!
I hope you like it! I know I sure will!

Did you see all the Blog Candy that Abby is offering??? All you have to do is comment on each blog for your chance to win!

Mr. Cricut Crazy--2 stamp sets
Scrappy Mom's Stamp set
PSA Essentials- 1 custom stamp, 1 peel and stick back, black ink, a 2-color ink, and alignment tool. 85 retail value!!!!!
Abby's Crinkle Ribbon- 15 yards
Mosipis Paper 8x8
Erin Lee Creative-- My Favorite Things paper stack

Your next stop is Libby


Pin It!